According to Raspberry Pi officials, the Raspberry Pi 5 has two to three times the processing power of the Raspberry Pi 4, which was already a powerful single-board computer. the Raspberry Pi 5 is available in 4GB and 8GB RAM capacities (with 1GB and 2GB models coming later), and has the same basic size and shape as the Model 4 B, but with many long-requested features, such as a built-in real-time clock, a PCIe 2.0 connector, and a power button. It has the same basic size and shape as the Model 4 B, but adds a number of long-requested features, such as a built-in real-time clock, a PCIe 2.0 connector, and a power button.
Perhaps more importantly, the Raspberry Pi comes with a new quad-core 2.4 GHz Cortex-A76 Arm CPU (older models started out with a Cortex-A72 running at 1.5 GHz, but a firmware update has brought it up to 1.8 GHz), a new southbridge that promises to increase USB 3 throughput, and a new VideoCore VII GPU running at 800 Mhz. VideoCore VII GPU (versus the 500 MHz VideoCore VI on the Pi 4). There are a number of small improvements throughout the motherboard, including a built-in fan connector with mounting holes, faster dual camera connectors, and a microSD card reader that works with high-speed cards.
Officially, the suggested retail price for the 4GB and 8GB models is just $60 or $80, which is only $5 more than the Raspberry Pi 4 SKU with the same amount of memory, making it a strong upgrade. But how good is the Raspberry Pi 5? How does it work with the existing ecosystem of HATs and accessories? We did some testing to find out.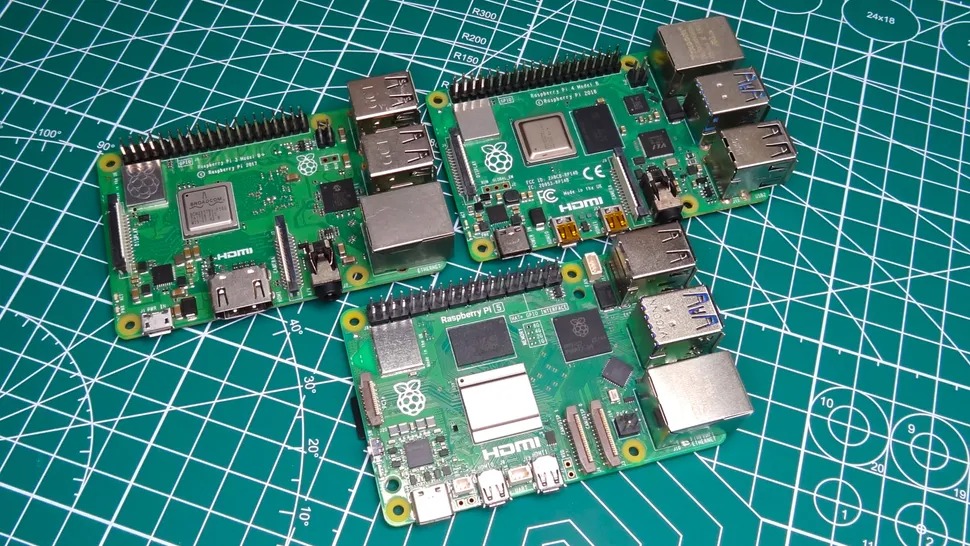
The Raspberry Pi 5 bears a striking resemblance to the Raspberry Pi 4 and 3B+.
On the surface, it's another classic Raspberry Pi board design that harkens back to 2014's B+ redesign, but take a closer look.The 3.5mm composite jack has disappeared, so there's no analog video/audio on this generation of Raspberry Pi. In other words, we haven't used that port since the Raspberry Pi 3.
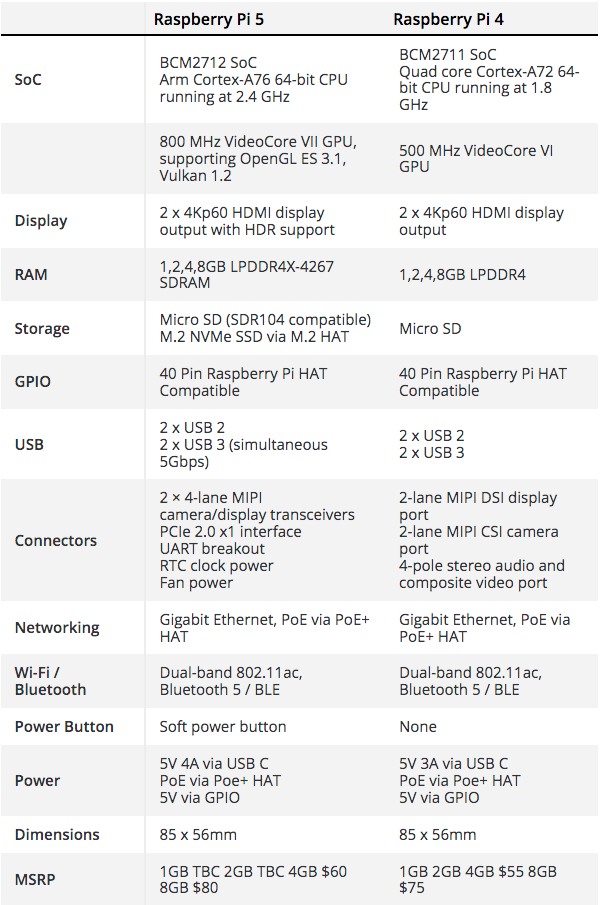
The Raspberry Pi 5 bears a striking resemblance to the Raspberry Pi 4 and 3B+. On the surface, it's another classic Raspberry Pi board design that harkens back to 2014's B+ redesign, but take a closer look.The 3.5mm composite jack has disappeared, so there's no analog video/audio on this generation of Raspberry Pi. That said, we haven't used that port since the Raspberry Pi 3.
The camera and display connectors are smaller, matching the Raspberry Pi Zero's smaller 15-pin connector (instead of the original 22-pin). Note also that there are now two connectors next to each other, and we can now connect two cameras, two DSI displays, or a mix of both.
The third connector is for PCIe devices. This is a PCIe 2.0 x1 interface for fast peripherals, and yes, that means NVMe SSDs. we asked Upton about this interface, and he confirmed that it will be available for all sizes of NVMe drives, but for that we need to use a specially designed M.2 HAT, which is not yet ready for release at the time of this review.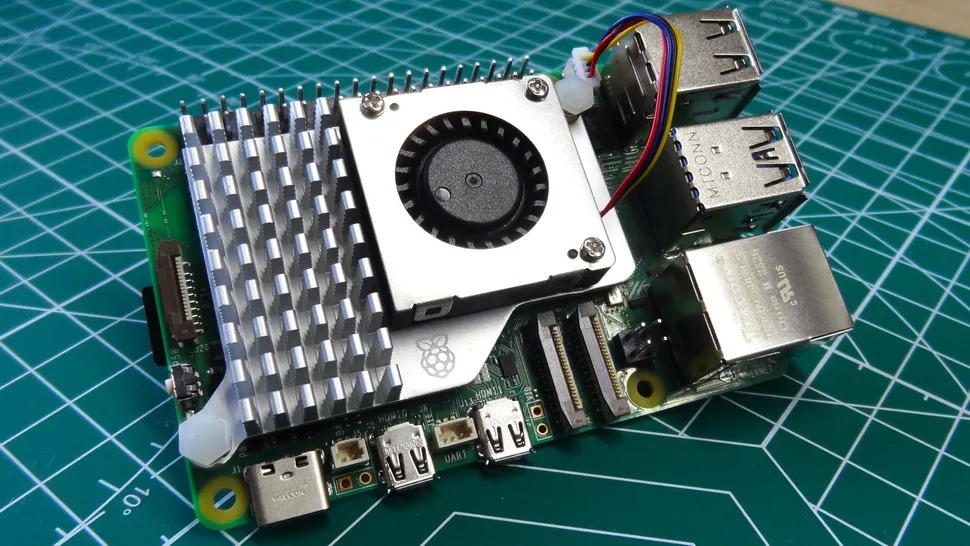
The Raspberry Pi 5 retains the dual micro HDMI ports introduced with the Raspberry Pi 4. Each port is capable of 4K 60 output, but to be honest, we've never used a Raspberry Pi with dual displays.Between the micro HDMI ports is a UART connector that can be used with the Raspberry Pi Pico debugging kit, or for establishing a UART connection with other microcontrollers.
For those of you with a keen eye, you'll notice that the USB and Ethernet ports have been swapped. the Raspberry Pi 5 seems to have taken its cue from an old motherboard. the Raspberry Pi 4 saw the ports swapped, and now they've been swapped back. What does this mean? It means that the Raspberry Pi 5 will need a new case. In addition to the port changes, there are a few subtle differences that will make the case designed for the older Raspberry Pi B-boards no longer compatible. Interestingly, the Raspberry Pi 5 product brief states that "the enclosure should not be covered if used inside the enclosure". The reason for this is something we will address during the review, but in general the Raspberry Pi 5 CPU needs to be kept cool.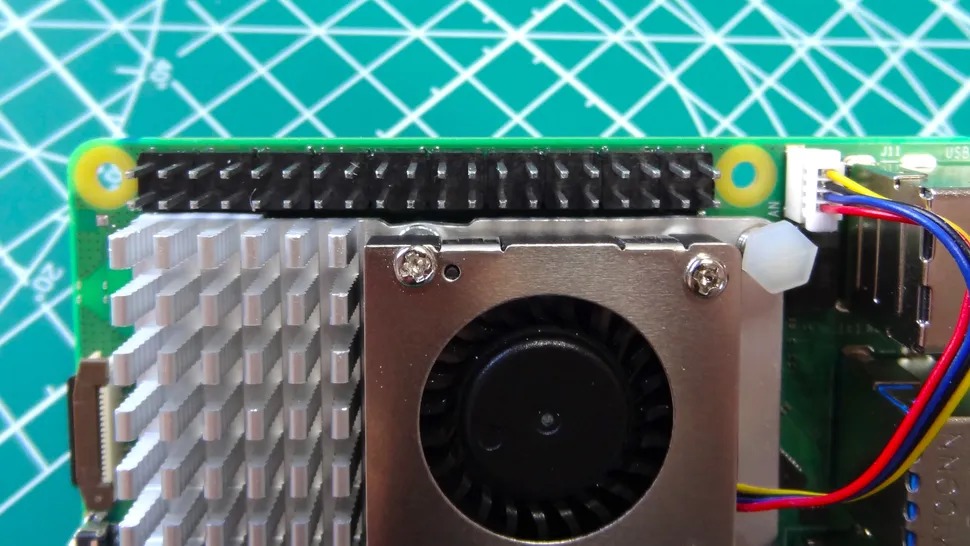
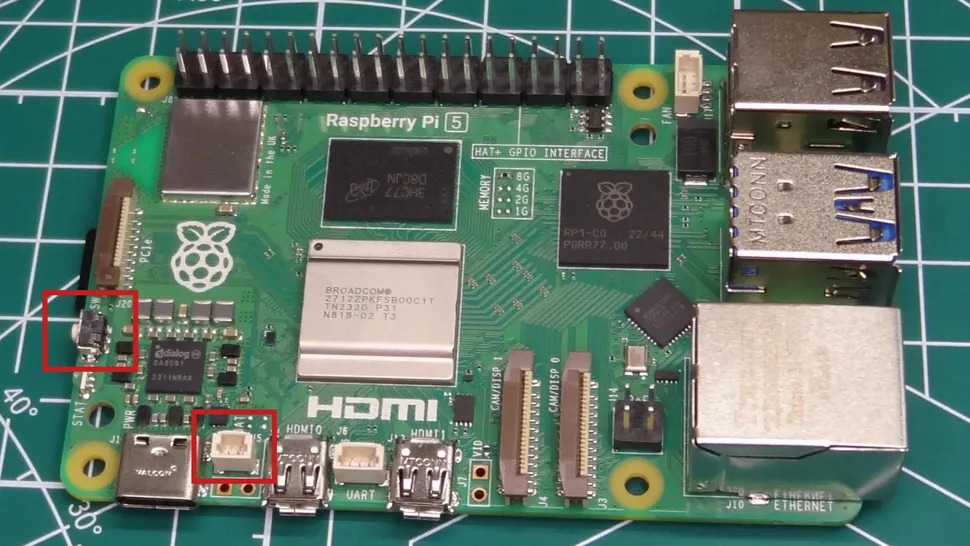
Let's introduce two new features of the Raspberry Pi 5. First, we have a real-time clock battery backup. Yes, your Raspberry Pi can now keep the correct time without the need for an NTP server or an add-on board taking up GPIO space.
Another new feature is the power button! Some may scoff at this add-on, but it's a feature that is often requested and has led some manufacturers to invent their own/buy third-party products. Once the Raspberry Pi is turned on, one press will open the shutdown/logout menu. Pressing it again will trigger a safe shutdown. This shutdown is more like standby, with the Raspberry Pi consuming 1.4 W. Pressing the power button starts the Raspberry Pi 5. You can also program the operating system so that the button performs other actions, as it is a momentary button rather than a hard switch that cuts off power.
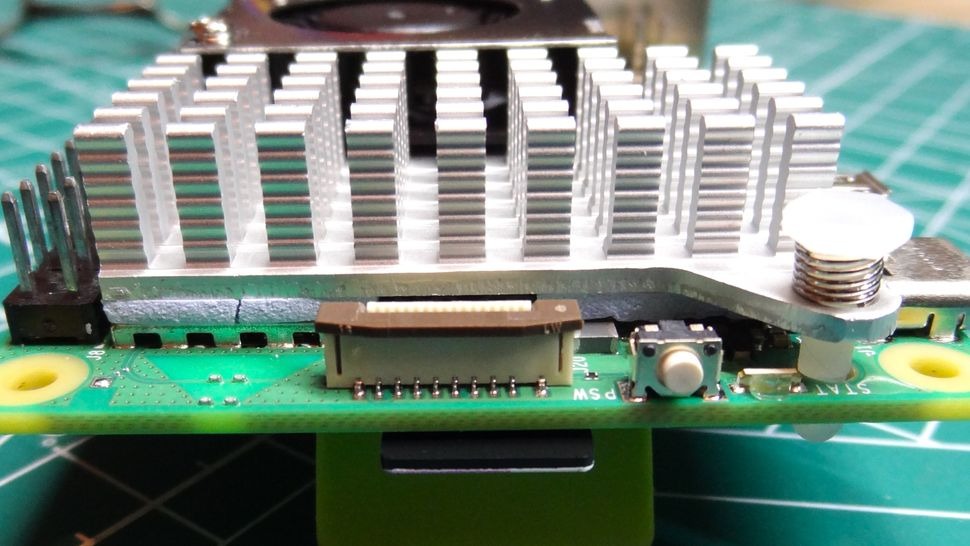
One thing that has stayed the same is the now ubiquitous 40-pin GPIO. 40-pin GPIOs were first introduced with the Raspberry Pi B+ in 2014, and also introduced the HAT (Hardware Attached to the Top) standard, which is a standard similar to Arduino's Shield that provides standard design templates and electronic standardization for the growing selection of add-ons. The GPIOs on the Raspberry Pi 5 are essentially the same as on previous models, with a few changes. More on that later.
Raspberry Pi 5 Thermal and Power Performance
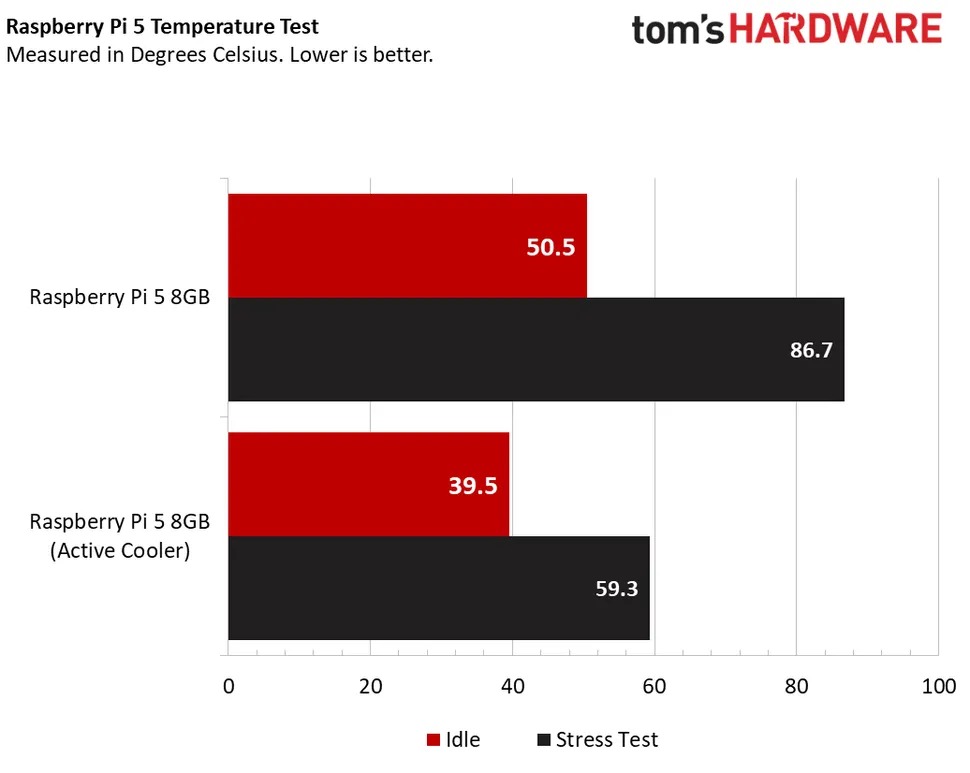
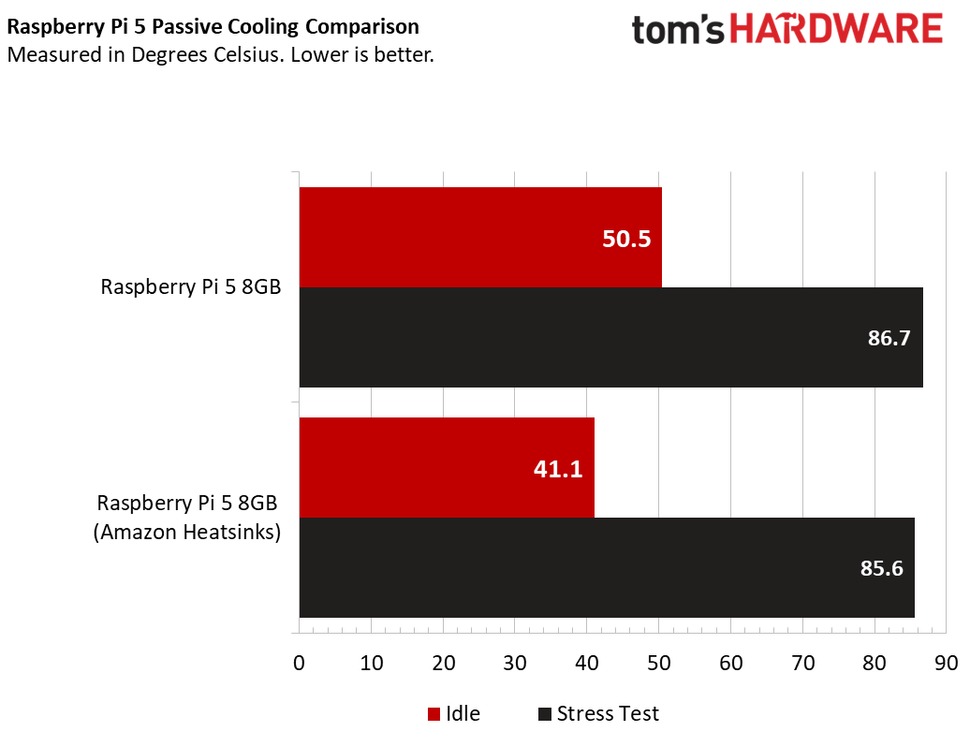
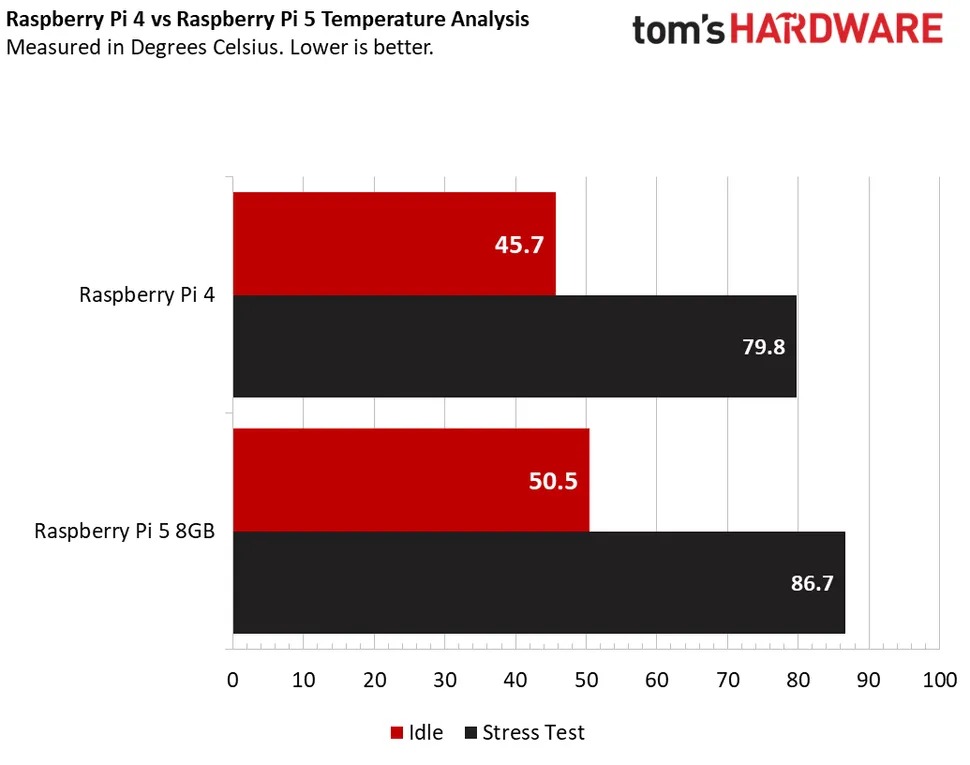
The question you are asking is "How does this compare to the Raspberry Pi 4?" At idle, the Raspberry Pi 4 runs at 45.7 C and consumes 1.02 W. Under stress, we see the temperature jump to 79.8 C and the Pi 4 consumes 6.2 W. The Raspberry Pi 5 uses about 1W more computing power.
The Raspberry Pi 5 consumes roughly 1 W more power and has more computational power.Where the Raspberry Pi 4 beats the Pi 5 is in its stress test temperature without cooling: 79.8 C compared to the Pi 5's 86.7 C (thermal throttling). But with the active cooler down, the Pi 5's temperature dropped to 59.3 C, providing us with excellent processing power while keeping temperatures relatively low.
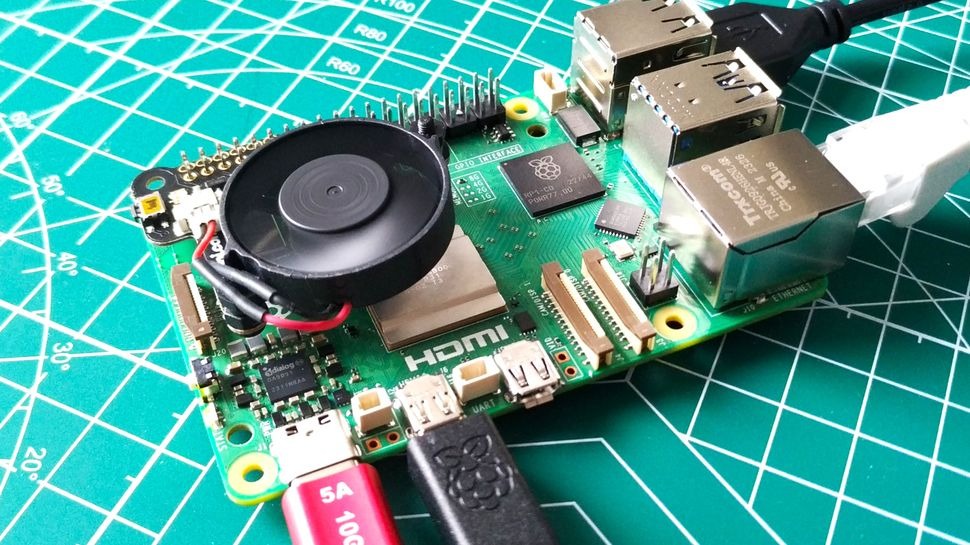
The Raspberry Pi 5 is the hotter product of the Raspberry Pi, which means that for optimal performance we need cooling. We tested the official Raspberry Pi Active Cooler and it worked quite well. The cooler is a combination of an aluminum heat sink (with a lovely anodized Raspberry Pi logo) and a blower.
It cools Arm-based SoCs, RAM, and the new RP1 chips. The active cooler is not connected to the M2.5 mounting holes, but has its own mounting holes. One is located next to the USB C port and the other between the GPIO and USB ports. The active cooler uses a push-in plastic/nylon plug to hold the cooler in place. The cooler can be removed. Carefully squeeze and push the plastic pin with sharp-nosed pliers or a plastic pencil.

The RockBee uses the same official similar cooler connected to the new fan connector right next to the USB port, which is a big improvement over the previous Pi, where any fan you connected had to take up a GPIO pin, which sometimes got in the way of the HAT. The fans kick in when the CPU reaches 50°C. When idle, the heatsink keeps the Raspberry Pi 5 at 39.5°C with a power consumption of 2.6 watts. Running our stress test found the temperature rose to 59.3°C (6.8 watts) well below the thermal throttle point. It would appear that the Raspberry Pi 5 consumes less power when running with cooling than without.
The Raspberry Pi 5 introduces a new feature: the power button. I know this isn't earth-shattering news for many of us; we had power buttons on our home computers in the 1970s, but the Raspberry Pi has never had a power button until now.
The button is a soft power button that invokes a script to choose between logging off/shutting down/restarting, or pressing it again will soft-shut down the Raspberry Pi, placing it in standby mode. In standby, the Raspberry Pi 5 draws 1.3 watts, about half the power of an idle Raspberry Pi. But we can go even lower. the Raspberry Pi engineering team has provided us with instructions on how to reduce our standby power consumption, and the results we've seen!
Our standby power consumption is now 0.05W, many times lower than before. This leaves the 5V GPIO pin high, but the 3V3 pin low. This can be a problem for your favorite HAT, as it may not shut down with the Raspberry Pi. a revised version of the HAT specification, HAT+, will address this issue, and instructions will be provided by the Raspberry Pi.
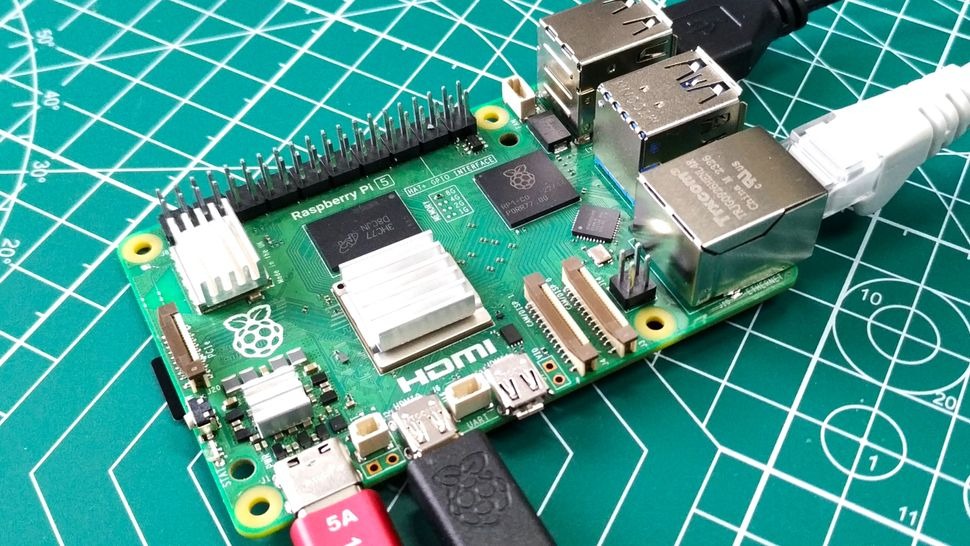
Can we use existing heat sinks and fans to cool the Raspberry Pi 5? The answer is yes, but given the variation in board layout, not every cooler will fit.
The set decoration, which looks like something out of a 1970s sci-fi show, doesn't affect its cooling performance. A solid block of aluminum absorbs heat from the chip. Unfortunately, this cooler is not available for the Raspberry Pi 5.
Can we overclock the Raspberry Pi 5?
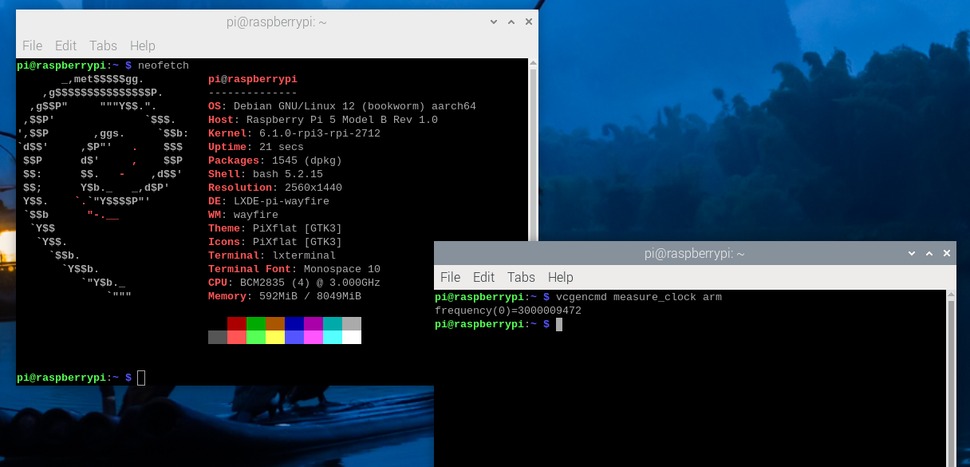
In short, the answer is yes, but how fast you can go depends on the "silicon lottery". Overclocking is a simple process that requires a few tweaks to the configuration file. In our tests we managed to overclock the CPU to 3 GHz, and we did manage 3.2 GHz, but the system reported different speeds in neofetch and vcgencmd. Neofetch reported 3.2 GHz, but vcgencmd reported 3 GHz, and after talking to the Raspberry Pi engineering team we were convinced that the 3.2 GHz speed was wrong. After talking to the Raspberry Pi engineering team, we were convinced that the 3.2 GHz speed was incorrect and omitted the data from our review.
For any overclocking, you need good cooling. Passive cooling via a small heatsink won't work because you need active cooling to get the temperature below the 80°C thermal throttling trigger. At 3 GHz, the Raspberry Pi 5 idles at 46.6°C and consumes 3 watts of power. Under stress, the Raspberry Pi 5 reaches a maximum temperature of 69.2°C and consumes 10 watts of power.
64-bit Operating System
Our review unit came with a microSD card running the latest pre-release version of the Raspberry Pi operating system, but this time it was a 64-bit operating system running the Linux kernel 6.1.0. 64-bit versions of the Raspberry Pi operating system have a long history of falling behind the popular 32-bit versions. This is largely due to the fact that many older motherboards only support 32-bit operating systems. However, starting with the Raspberry Pi 3, a 64-bit operating system is now supported.
The new operating system is based on Debian 12, codenamed "Bookworm" and released in July 2023. Bookworm has made a number of changes, one of the biggest of which is a new version of Python. In previous versions we have seen Python 3.9 as the default, but for Bookworm we see an upgrade. For Bookworm, we see an upgrade to 3.11, which changes the way we install Python modules.
In the past, we would install Python modules system-wide or per-user wide. This worked well for many users, but it could break/conflict your base OS Python installation, which would use a package manager and install Python modules via pip. In Python 3.11, we saw the introduction of PEP 668 to prevent or at least mitigate the effects.
The goal of PEP 668 is to minimize the possibility of user-installed Python modules interfering with the version of Python installed for the operating system and used for operating system-specific tools and end-user applications.PEP 668 does not allow the user to install Python packages to the host operating system using pip. Instead, we must create a virtual environment (venv), activate it, and then install the Python module of our choice. This venv is isolated from the operating system and will not cause any problems. It does make installing Python modules a bit tricky for newbies, but it has more of an impact for companies that produce third-party add-ons and HATs.
Processing Performance
With faster boot times, faster micro SD card performance, and a 64-bit operating system, we have a much more speed-conscious system, and the Raspberry Pi claims that the Raspberry Pi 5 is two to three times faster than the Raspberry Pi 4, and that's how fast it feels overall.
Opening applications is much faster. On the supplied micro SD card, it took 5.5 seconds to open Gimp on the Raspberry Pi 5, compared to 10.8 seconds on the Raspberry Pi 4. Opening Firefox on the Pi 5 took 5.1 seconds, compared to 8.6 seconds on the Raspberry Pi 4.
The difference between the generations is clear in the combined benchmarks. In Sysbench's CPU test in single-threaded mode, the Pi 5 generates 2,729 events per second, while the Pi 4 generates 1,766 events per second (the more events the better). When we upped the ante to four threads, Pi 5 again won 10,912 events, a 54% improvement.
When we ran the 7-Zip compression benchmark, the Pi 5 compressed at 9,543 MIPS compared to 4,287 on the older model, a 122 percent improvement. It also provided 13,231 MIP decompressions compared to 7,568 on the Pi 4.
We haven't run the full suite of AI tests yet, but we were able to run the TensorFlow Lite benchmark from the Phoronix Benchmark Suite using the SqueezeNet neutral network. In this test, the lower the score (i.e., the number of microseconds it took the computer to complete the task), the better. 25,276 microseconds were spent by the Pi 5, compared to 80,327 microseconds by the Pi 4, a 68% difference.
Video playback and streaming
Like the Raspberry Pi 4, the Pi 5 is capable of outputting to two displays at up to 4K resolution via its dual microHDMI ports. With its enhanced GPU, the motherboard promises to deliver 60 Hz on each screen, even using HDR colors (if available).
We couldn't (yet) get it to perform HDR or verify that it was outputting at 60 Hz, but it can easily output to a single 4K monitor, and we have good reason to believe that it can power a second monitor (as its predecessor) did). The bigger question is how the board will handle challenging situations, such as high-resolution streaming video from YouTube.
Streaming video has long been the Raspberry Pi's Achilles heel, and the faster GPU and CPU are expected to improve that. However, YouTube still didn't perform as well as it should have during our tests. Running the screen at 1080p resolution, we played Tears of Steel on YouTube at 1080p / 30 (actually more like 24 fps) and the performance was very smooth, with very few dropped frames. When we switched to natural video at 1080p, 60 fps, the image still looked pretty smooth, although YouTube's "Stats for Nerds" overlay reported a fair amount of frame loss.
When we ran the screen at 4K but kept the video running at 1080p, both videos were very choppy and slow, and Stats for Nerds' stats show that each of them lost about two-thirds of their frame rate. This was true regardless of whether the video was played full-screen or only in a portion of the browser window. Even resizing the video player was slow.
Perhaps a future software update or configuration tweak will make YouTube streaming better. However, the fact that it plays quite smoothly at 1080p when the screen is 1080p is still a big improvement over the previous Pi.
USB and MicroSD card performance, RP1 chip
The Raspberry Pi has a new "Pi Silicon" chip on the motherboard, the RP1. The RP1 looks a lot like the RP2040 (the Raspberry Pi's first foray into custom chips), and it provides a lot of the I/O for the Raspberry Pi 5.
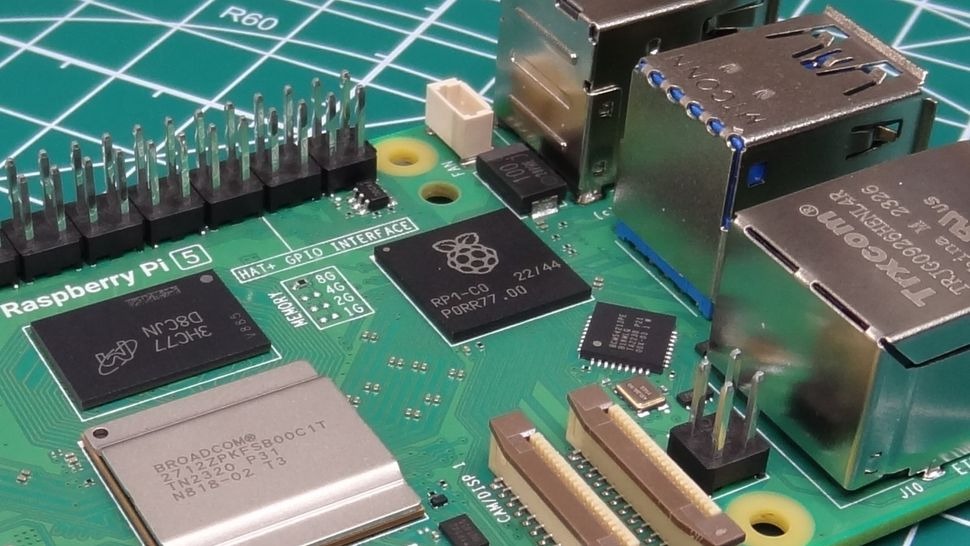
According to the product brief we received, the RP1 offers more than twice the USB bandwidth of previous models, resulting in faster transfer speeds using UAS (USB Attached SCSI) USB drives.The RP1 also offers a dedicated four-channel 1.5 Gbps MIPI camera and display interface. This triples the total bandwidth of the camera and display combination. Keep in mind, however, that the theoretical maximum speed of the USB 3.0 port is the same as the Pi 4, which is 5 Gbps, so we rely on the enhanced processing power to increase throughput.
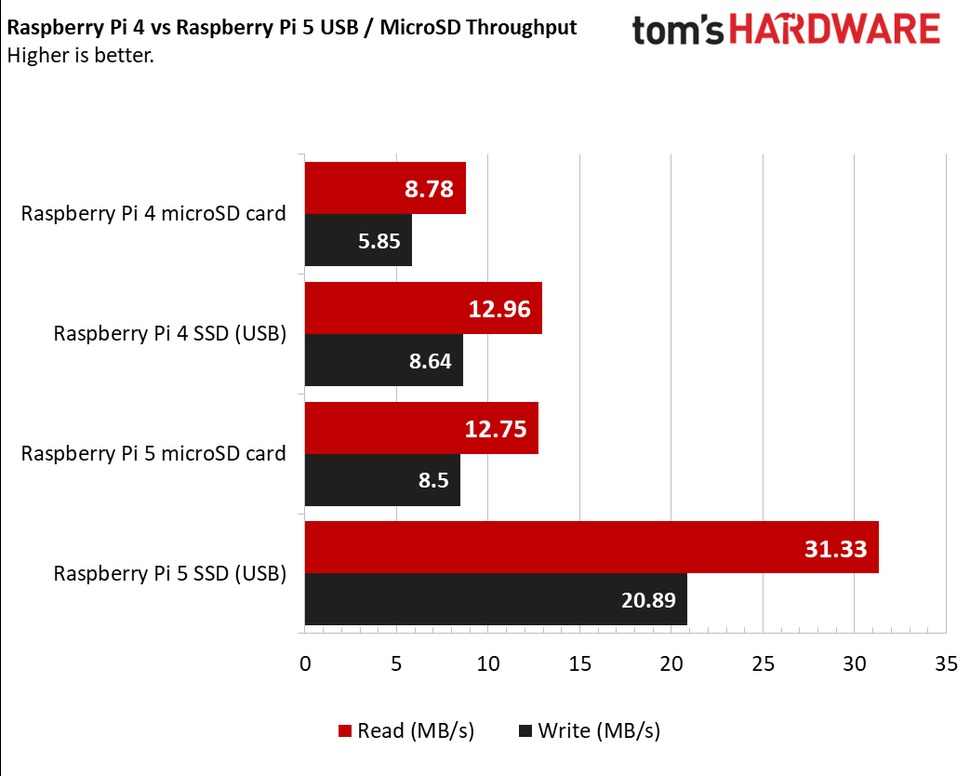
To see how fast the USB 3 connection on the Pi 5 is, we performed storage benchmarks on the built-in microSD card reader and the PCIe 3.0 SSD that sits in the enclosure and connects via USB. Using Sysbench's file IO tests, the Raspberry Pi 5 was able to read from the Kingston Canvas Go Plus microSD card at 12.75MB/s and write at 8.5MB/s. Meanwhile, the SSD was able to read at 31.33 MB/s and write at 20.89 MB/s.
How does this compare to the Raspberry Pi 4? The Kingston Canvas Go Plus reads at 8.78 MB/s and writes at 5.85 MB/s, while the SSD reads at 12.96 MB/s and writes at 8.64 MB/s. So both the USB 3.0 and microSD card reader ports are more than twice as fast.
Speaking of microSD, the Pi 5's card reader now supports higher-speed microSD cards using the SDR104 standard, a subset of the popular UHS-I card standard that theoretically transfers at speeds of up to 104 MBps. While very few cards are actually labeled as supporting SDR104, you can find UHS- I cards claiming transfer speeds of over 100 MBps. I. The Pi 4's reader theoretically maxes out at about 50 MBps, but in practice we never saw a card go faster than 40 MBps.
We tried several different microSD cards on the Pi 5 and Pi 4. Using the storage benchmark IOZone, we found sequential read and write speeds in the 86 and 55 MBps range for the Kingston Canvas Go Plus, which is rated at 170 MBps. Sequential write speeds for the same card on the Pi 4 ranged from 37 to 41 MBps.
There's also an M.2 connector on the Raspberry Pi 4 that lets you connect an SSD directly to it. This is quite an improvement and we can't wait to use it to test NVMe drives when the required M.2 HAT is available. These already impressive numbers should be erased.
Using GPIO
GPIO is the crowning glory of the Raspberry Pi. These 40 GPIO pins open up a world of electronic projects using our preferred programming language. the Raspberry Pi has a long association with Python, which is the primary language of choice for many projects, but we can also write GPIO code in Lua, Go, C, JavaScript, BASIC, or other languages.
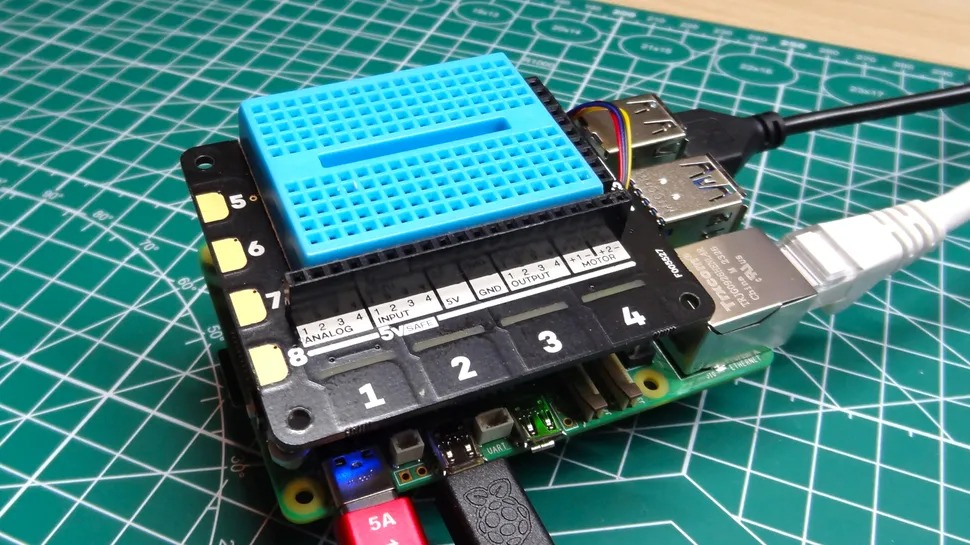
Our tests typically involve interacting with GPIOs using the Python modules RPi.GPIO and GPIO Zero. We performed the usual GPIO Zero battery test without any problems, which is good news for beginners looking to familiarize themselves with electronics and the Raspberry Pi. While GPIO Zero worked perfectly, RPi.GPIO proved to be an issue, which was attributed to some behind-the-scenes configuration.
GPIO module was created by Ben Croston in the early days of the Raspberry Pi, and it quickly became the standard for many Raspberry Pi projects and hardware. RPi.GPIO is most likely sitting underneath your favorite Raspberry Pi HAT software module, which means that your Raspberry Pi 5 experience may not be smooth sailing at first. GPIO is likely to sit underneath your favorite Raspberry Pi HAT software module, which means your Raspberry Pi 5 experience may not be smooth sailing at first. In fact, we were unable to properly test any of the popular third-party HATs. The official Raspberry Pi Sense HAT tested correctly, probably because it uses libgpiod on RPi.GPIO.
Gordon Hollingworth, Raspberry Pi CTO, provided a statement about PEP668 and Raspberry Pi 5 HAT compatibility.
"The Raspberry Pi operating system will follow the Debian operating system, Ubuntu and other operating systems in adopting PEP668, which encourages users to be aware of issues they may encounter when installing, updating, and removing packages from their systems using pip. Additional documentation will be provided to help our users understand this change, and we will introduce users to tools such as virtualenvwrapper, which make the process easier.
Any HAT that communicates using the standard Linux interface will work without software changes. However, there are a large number of HATs whose software relies on non-portable interfaces, such as RPi.GPIO, which break every time we release a new hardware device. In the pre-release phase, we are working closely with manufacturers to update their software in time for the release of the Raspberry Pi 5, which is one of the clear advantages of releasing and distributing our products separately!"
As Hollingworth says, the time between this announcement and the retail release of the Raspberry Pi 5 will give manufacturers time to prepare many of the best Raspberry Pi HATs and plug-ins for the Raspberry Pi 5. We will be retesting some of the motherboards once they are released. The official launch has already happened.
Also note that your access to the jumpered GPIOs is not blocked when the active cooler is in place. Finding a pin can be a bit tricky, but not impossible. Just make sure the wires are away from the spinning fan. If you plan on using a HAT or other plug-in with GPIOs, purchase a 2×20 female to male adapter card. This will give you clearance above the cooler and keep the air intake open. Some M2.5 brackets and screws (about $10 on Amazon) will help stabilize the motherboard.
Dual camera support
The Raspberry Pi 5 introduces multi-camera support to mainstream Pi boards, compute module users will be used to multi-camera support as it has been built into compute module IO boards since day one, but most Pi fans probably don't have a compute module.
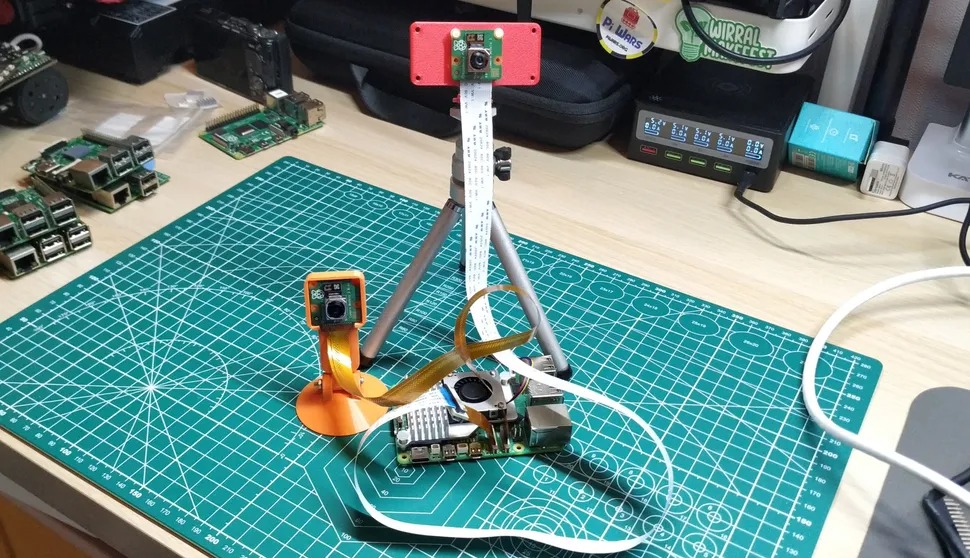
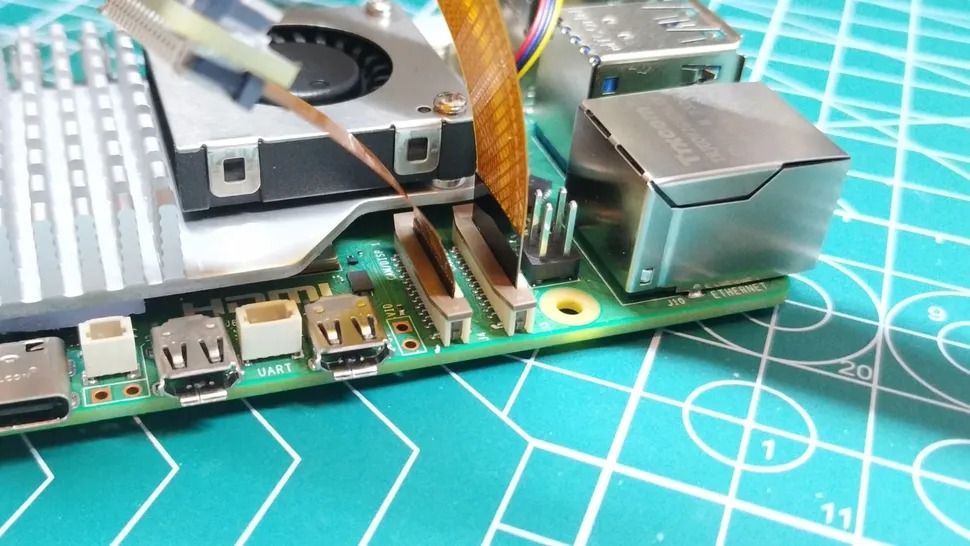

In terms of coding, both the libcamera and Picamera2 Python modules support multiple cameras, which we tested successfully with Picamera by passing libcamera's camera parameter (0 or 1) and using the correct camera constructor (again, 0 or 1).
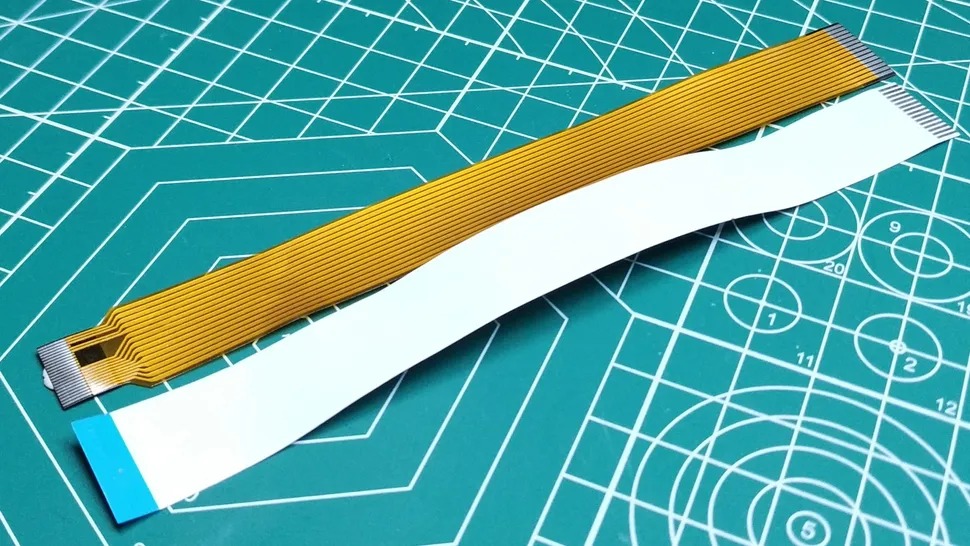
The camera/display connector uses a 15-pin connector that was previously used on the Raspberry Pi Zero series boards, most recently the Raspberry Pi Zero 2 W. The camera module and older Raspberry Pi versions use a 22-pin connector that requires a replacement cable or adapter. We tested with a Raspberry Pi 5 and all went well.
Power over Ethernet Support
The Raspberry Pi 5 supports Power over Ethernet (PoE), but you will need to purchase a new PoE HAT in order to use it.The Raspberry Pi 3B+ and Raspberry Pi 4 initially placed the PoE connector between the GPIOs and the Ethernet port, which is where the Raspberry Pi 5 used to be for the fan connector, but the PoE connector is now moved to the bottom of the board, between the camera/display connector and the Ethernet port. So we can't just use a few jumpers to make the connections. The PoE HAT is expected to be replaced in the near future.
Emulation with Raspberry Pi 5
At the time of writing, emulation on the Raspberry Pi 5 is catching up. No doubt RetroPie, Lakka, Recalbox and others will be working on updating their respective products. As soon as compatible images become available, we will test them.
If your tastes go further back in time, then we are 100% confident that the Raspberry Pi 5 has enough processing power to support 8-bit, 16-bit and many 32-bit consoles. It can even improve the performance of some later arcade cabinets (from the late 1990s onwards) that have custom chips that require emulation.
